Making tricky things easy …

Today I was on amazon looking for some technical literature (about Kubernetes if you’re wondering), when I suddenly wondered if there was a newer version of my old amazon firestick available …

There was.

All of a sudden … I switched to wondering how I was going to avoid being stuck with trying to offload an extra (older) firestick during a pandemic … when I see this …

When I hit that button, amazon showed me the exact order with my older firestick, offered me a 20% discount and all I had to do was drop it off at the UPS center. The only thing left to do was say … “yes, take my money”.

I did.

Making tricky things easy for your users will never go out of style.

Best way to install postgis for Postgres versions lower than 9.6.x? from source.

I recently had an absolute bear of a time trying to install the postgis extension for Postgresql 9.6.3 which I’m running because there is an error on upgrade from 9.6 to 10 around the hstore extension which seems impossible to get over unless I blow away all the data related to hstore or try this very tricky migration that basically massages hstore data.

First I tried to simply install postgis with homebrew. Silly me.
That upgraded my 9.6.3 installation to Postgress 11 and installed the extension. It took me 2 hours to pick through the debris, (dyld errors, had to ln -s the new readline library to the old one that postgres expecting after I ran
brew switch postgres 9.6.3

After that, I was able to install postgis with brew via two commands

brew pin postgres
and
brew install postgis --ignore-dependencies

That looked like it worked, but everytime I then tried to install the extension I’d get and error around this phrase (I lost the stacktrace in my glee of finding a fix)

Symbol not found: _AllocSetContextCreateExtended

I turns out what I had to do was uninstall postgis from brew

brew remove postgis

then go to the official postgis source page, pick a stable version (I had issues with 2.4.7. compile error on Mac OS) but 2.5.3 worked just fine.

I downloaded the tar file, uncompressed it then ran
./configure
make
make install

And VOILA! I was able to create the postgis extension for the db I was working on. phew!

puma-dev on OSX follow up (tips and tricks)

I’ve been doing a lot more Rails dev recently, and as I wrote about previously, I’ve really been enjoying using puma-dev to do that. I just wanted to add a couple of things to that initial post that may not be initially apparent.

Getting puma to stay idle longer

Out the box, puma-dev will spin down an app after 15 minutes of inactivity. This was a bit short for my tastes so I went asking around for how to extend this. Turns out you can run a simple command …

puma-dev -install -timeout 180m

On OSX this actually updates the plist file that launches puma-dev directly. which brings me to the next point …

Restarting puma-dev manually

On OSX. The puma-dev plist file used by launchd to run puma-dev on startup, seems to be located at /Users/<your username>/Library/LaunchAgents/io.puma.dev.plist

The reason why this is important is that in the puma-dev readme, it says to restart puma-dev by running.

pkill -USR1 puma-dev

However. Lets say, you’ve misconfigured your plist file (like I managed to do), launchd will keep trying to run puma-dev and failing all the while spitting out an error that looks like this in your puma log files every ten seconds

Error listening: accept tcp 0.0.0.0:0: accept: invalid argument

The dead giveaway is entries like this in your system log files located at /private/var/log/system.log

io.puma.dev[1616]): Service exited with abnormal code: 1
Service only ran for 0 seconds. Pushing respawn out by 10 seconds

To stop this just run this command


launchctl unload /Users/<your username>/Library/LaunchAgents/io.puma.dev.plist

This will let you fix up your plist file. Then you can restart it with this command

launchctl load /Users/<your username>/Library/LaunchAgents/io.puma.dev.plist

You can also use this as a way of starting and restarting puma-dev.

Running on a different port

If you have Apache running on port 80 and don’t pass in the right command when installing then puma-dev will fail to launch, and keep failing as described above.

This means you have to run `puma-dev install` with the http-port flag, for example

puma-dev -install -http-port 81

I like this, not for the reason you’d think, but because it allows me access my apps on https://<appname>.dev, while still accessing my php apps with apache on port 80!

Something to note though is that you have to run this command everytime you run `puma-dev install`, or else it will overwrite your settings in your plist file and cause you hours of grief as you try to figure out how you broke all the things amidsts rending of hair and gnashing of teeth

To illustrate … say you have your port set to 81 and you run the command we discussed first

puma-dev -install -timeout 180m

This will reset your port to 80 quietly, and puma-dev will start failing as I described previously. so to avoid that you want to run

puma-dev -install -timeout 180m -http-port 81

instead.

This behavior is subtle enough to cause problems for someone who may have installed puma-dev a while ago and forgotten where everything is and how it all works, so I filed a bug report about it.

Hope this helps someone avoid a stressful afternoon or two!

Rails dev with puma-dev

A few months ago the creator of my favorite rails server (puma) announced a version of puma called puma-dev. This new server bears more than a passing resemblance to pow, because of its goal of making local rails development stupendously easy.

I was a big fan of pow when it first came out but I eventually stopped using it when it as development on it slowly crawled to a halt then eventually stopped. Having come to Rails development from a PHP background, where the server was always available,

  • I didn’t like having to type `puma` or `rails s` to start working on a local application, or …
  • having to remember and assign different port numbers if I was working on more than one app at a time. So I was definitely excited about having puma-dev pick up where pow left off.
  • it also made playing around with subdomains easier

So I was definitely looking forward to having it pick up from where I left off with pow

Setup is super easy. First make sure to include puma in your Gemfile

gem 'puma'

Then run `puma` at the command line and make sure your app starts up with no problems.
Next install puma-dev

brew install puma/puma/puma-dev
sudo puma-dev -setup
puma-dev -install

To setup yourdomain.dev (for example), you’d just run

puma-dev link yourdomain /path/to/your/app

And voila!

I’ve been using this setup for a few months now, and I must say, I find this immensely useful because I have an apache server running on port 80 for my PHP work, so I can actually access a domain on https://mydomain.dev. It also supports websockets!

Things to note

  • puma-dev will spin down the server after a few minutes of inactivity, so don’t be surprised if your app takes a few seconds to startup after you’ve been gone for a while
  • To restart the server (in case you’re working on something that doesn’t auto load or isn’t loading correctly)  just run `touch tmp/restart.txt` from rails root

How to fail

Convincing Failure

There are two ways to fail and the consequences are orders of magnitude apart. Convincing failures allow us to make better decisions in the future. We tend to agonize over the risk of executing something poorly but the much bigger risk is building the wrong thing to begin with.

This is one of my favorite articles about Failure. Written by Andrew Bosworth, almost a year ago now (who I wish would blog more), I still reference it from time to time to remind myself of the lesson in it, which is …

“… if you execute to a level of quality that makes it unlikely that another team, even with more time and effort, could succeed, then yours is a convincing failure. This kind of failure is strategically valuable because we can now eliminate an entire development path from consideration. That means subsequent work is dramatically more likely to succeed. A convincing success is unquestionably the goal of every effort, but a convincing failure should be a close second.”

For me the lesson that lies inside of that nugget doesn’t just apply to Engineering teams, it applies to life.

Lots of times, people will try something, but they’ll do it half heartedly. They might open a business, or try to do standup comedy, or try to make a pro team (that was me), but they don’t give it their all … maybe they want to string some wins together so that they can convince their friends and family that this isn’t some flight of fancy, or maybe they’re afraid that they’ll fail, so if they don’t give it everything they’ve got, it won’t hurt as much when things don’t work out. The problem with this approach is that, just like the article says, you’re still left wondering “what if?” when the opportunity finally fades from view. Which in a lot of ways is worse than not trying at all.

I like reading this article because it reminds me that if I try something in my personal life, that I want to either succeed or I fail … hard. No in between.

Using rails and having trouble getting Mysql’s wait_timeout to work? read this.

tldr; mysql2 gem specifies a default wait_timeout of 2147483 seconds that overrides whatever you set on a mysql server

I spent a whole day yesterday trying to debug why updating mysql’s wait_timeout wasn’t working.

Initially, we were having some trouble with a small mysql ec2 instance that was running out of memory because

  1. it had less ram than other boxes doing the same thing (we’d forgotten to upgrade it)
  2. it would spawn too many connections (12k or so) which take up memory and because there was no swap specified, when mysql grew too big, it would get killed by the os.

All pretty silly really. It could have been solved by just getting a bigger box, but there were a bunch of reasons why that wasn’t possible right at that second. And there were similar boxes that had been overlooked but were doing fine, difference was they had fewer connections … about 8k vs our 12k.

In checking out the connections, I realized almost 80% of them were sleeping and had been sleeping for a long time. I figured that setting a low enough wait_timeout (something like 120 seconds or so … average user session limit) on that box would solve the problem. I was worried about “mysql server has gone away” airbrake errors showing up, but I figured it was worth a shot to see if it relieved the memory pressure enough to stop worrying about this particular mysql server dying every few days.

We updated the settings from the mysql console (setting the GLOBAL wait_timeout there), restarted the server, and waited …but the mysql connections just traipsed past the wait_timeout limit.

odd.

Initially I thought It’d been done incorrectly, so I manually edited the my.cnf file and restarted the mysql process again, which was painful because even though this was a small box, it had about 11G of mysql in memory that it had to flush.

Again the connections came back up and went past the limit we set.

After investigating for a while, I remembered having encountered a similar problem a few months ago when I tried to do the same thing on a personal project. I had been able to set the wait_timeout on my production server but never got it to work on my local environment.

I raced home and started looking around to see what the difference was between the two. That’s when I realized that I had specified a wait_timeout in the database.yml of my production box but not my dev box. After googling for a bit I finally pieced it all together.

It turns out that the mysql2 gem does this thing …

ConnectionPool uses wait_timeout to decide how long to wait for a connection checkout on a full connection pool, and it defaults to 5 seconds.

mysql2_adapter uses this same wait_timeout , but passes it directly to mysql, and defaults to a much larger 2592000!!

Things have changed a little from that github issue being filed, but essentially it substitutes a default wait_timeout value of about 25 days (2147483s) of its own as the wait_timeout value (probably the session version of wait_timeout) that the mysql connection uses, basically overriding whatever setting we specify on the server.

By setting a wait_timeout: value in config/database.yml the timeout works as it should. When the connection gets killed, however, you get the infamous “mysql server has gone away” errors.

By specifying an accompanying
reconnect: true
option in database.yml, this is fixed, but in a quirky way.

Everytime the connection is reused, say you run an active record command at the console … then run another one, the connection’s timer is reset, BUT after that the connection it uses the wait_timeout setting that you configured from mysql directly.

So if you specified a 10 second timeout in your database.yml, and 15 seconds in your my.cnf file, then you logged into the console and ran an Active Record command.

Mysql would spawn a connection that would sleep after it was done for 10 seconds before being closed by mysql.

If before the end of that 10 seconds you ran another command, it would execute it and then start to sleep again, but now (and every time after) it would sleep for the 15 seconds specified in my.cnf before being killed by mysql.

Hope that piece of trivia brightens up your day 😀

ActionView::Template::Error: No response from searchd (status: , version: )

I came home from a week long company hackathon to see my newrelic error reporting going crazy …

sphinx error driving new relic CRAZY

sphinx error driving new relic CRAZY

My free bugsnag account had already maxed out of the 2000 error allocation I had for the entire month (I’ll usually get 100 in a month … maybe).

I immediately knew from the exception in new relic that something was wrong with Sphinx, and I figured it was pretty bad because on each page load of news pages, I hit sphinx to give me a list of related news stories, which meant that the crawlers that hit my site every second of the day could be generating loads of exceptions.

However, when I went to pull up one of my news pages … it loaded just fine …

hmmm.

I hit the search page, and got a 500 error. Weird as that may be, I’d encountered that before. I immediately logged into my vps and ran

`rake ts:restart`

at the console and was ready to drop my mic and moonwalk back to my sofa to catch up on “The Americans”.

Then I looked at my new relic account and noticed that the same error was still coming in 10 minutes after it should have been fixed.

hmmmmmmmmmmmm.

I tried hitting the urls specified in the errors and got the 500 error. I realized that some urls were exhibiting the problem while others weren’t.

I’d never seen that before :\

My google-fu quickly turned up this non-upvoted gem that helped me fix the issue. Basically you just have to rotate your sphinx index because that error means parts of it have gone “stale”.

the command I used to accomplish this was

`/usr/bin/indexer –rotate xx_core –config /path/to/your/sphinx/production.sphinx.conf`

your indexer command might be located somewhere different though; to locate mine I just used the `whereis indexer` command

You’ll want to change xx_core to match the name of your index (which you can find by looking in your sphinx.conf file)

Hope this helps you out!

I upgraded to Ruby 2.1.0 and all I got was this lousy T-shirt …

Ruby 2.1.0 was released about 2 weeks ago, and after seeing a notable speed performance improvement with my Rails app when going from 1.9.3 to 2.0.0 I was excited to see if the same would happen with Ruby 2.1.0.

I quickly ran another set of very casual tests, mainly running test suites and noting startup times of rails commands and rake tasks at the command line. What I saw was a 20% improvement in those tasks. Nothing to sneeze at …

Excited, I rushed to upgrade my tiny Rails app to ruby 2.1.0 and after doing it I tracked the difference in New Relic

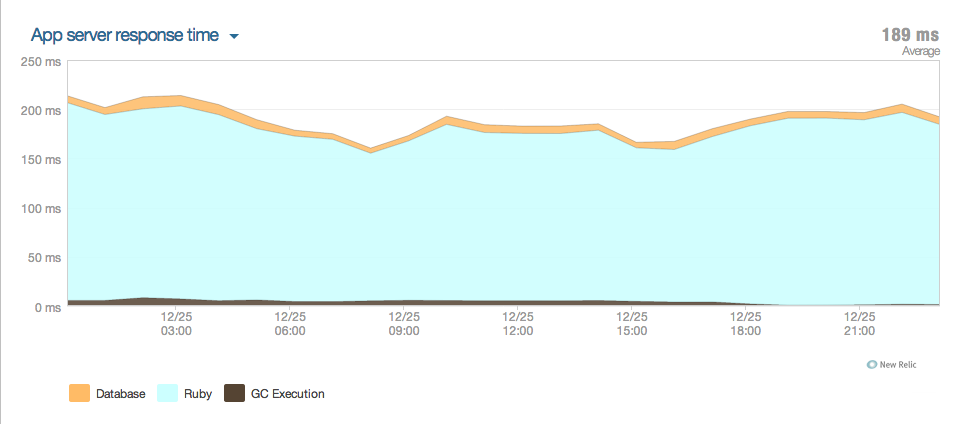
This was my result (deployment happened about 18:00 on December 25th, app is setup to run with one puma worker and 8-16 threads proxied to nginx)

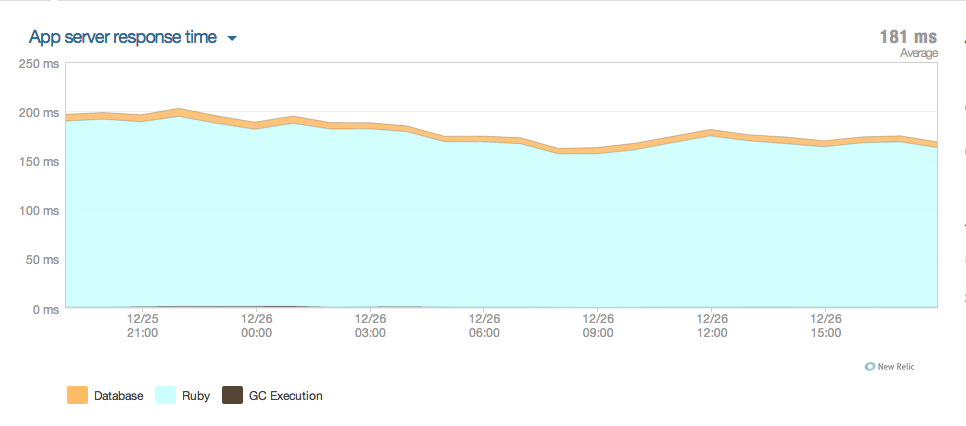
New Relic graph after upgrading to Ruby 2.1.0 (18:00 on the graph)As you can see, there wasn’t much of an improvement in performance at all. In fact here is the graph after a full day of running in the wild.

New Relic graph of my app after a full day of running with Ruby 2.1.0


So while you might get better startup times on Rails tasks, you probably won’t see too much of a speed boost on your servers.

Improved GC

What I found interesting, though, is the improved garbage collection. The brown part of the graph (GC execution) almost completely disappears in ruby 2.1.0. And its no wonder, a lot of work went into improving Garbage collection in ruby 2.1.0

The garbage collector in Ruby 2.1 implements a form of generational garbage collection, with Ruby calling their implementation RGenGC (Restricted Generational Garbage Collection).  This replaces the “Mark & Sweep” implementation used in previous versions of Ruby

Using RGenGC provides high compatibility with existing extensions while still bringing performance improvements.  Popular objects Array, String, Hash, Object, and Numeric are Write-Barrier protected, thus able to take advantage of the RGenGC system

The moral of the story? Ruby 2.1.0 has a small performance boost over Ruby 2.0 and upgrading to it should give you a bit of a boost with your Rails app, more if its a pretty big app with non-trivial time spent doing GC.

PS: Brian Hempel has created an awesome site that benchmarks ruby versions using Rails. His results are in line with what I found
PS2: Sorry there wasn’t actually a T-shirt, I just liked the title

If you’ve ever had ANYTHING to Do with Rails. ever. Please read this now.

What The Rails Security Issue Means For Your Startup!

There are many developers who are not presently active on a Ruby on Rails project who nonetheless have a vulnerable Rails application running on localhost:3000.  If they do, eventually, their local machine will be compromised. (Any page on the Internet which serves Javascript can, currently, root your Macbook if it is running an out-of-date Rails on it. No, it does not matter that the Internet can’t connect to your localhost:3000, because your browser can, and your browser will follow the attacker’s instructions to do so. It will probably be possible to eventually do this with an IMG tag, which means any webpage that can contain a user-supplied cat photo could ALSO contain a user-supplied remote code execution.)

How to try out puma with Apache right now!

I came across puma reading Mike Perham’s blog and was instantly intrigued. Its a threaded server that runs using one copy of your app vs the way Passenger does it by spinning up about 2 or more copies of your app as processes forked from a parent process and distributing requests to each one in turn to keep them all busy.

The thing that jumped out at me was the promise of memory savings by going from 5-6 processes in memory to 1. I run a 768MB VPS with linode. With Passenger I was running 500-600MB RAM usage because of the distinct ruby processes that Passenger forks to handle requests to your server. (Each process was about 80M and I was running 5 or 6 of them)

There is no Apache documentation for proxying to puma, but after looking at this example by the Phusion guys about how to proxy Apache to Passenger Standalone, I figured out a nice little step-by-step way to quickly try out puma to see if you like it or not.

This assumes you’re already running Phusion Passenger with Apache in production

  1. gem install puma on your server, don’t add it to your gemfile
  2. Now mosey on over here and get Apache Proxy installed,
    /etc/apache2/mods-available/proxy.conf will probably already be there for you so all you’ll probably have to do is
    a2enmod proxy
    a2enmod proxy_http
    /etc/init.d/apache2 restart
  3. Alright, now go find your apache.conf or httpd.conf file and comment out all the passenger related stuff, things like …#LoadModule passenger_module /opt/ruby-enterprise-1.8.7-2010.02/lib/ruby/gems/1.8/gems/passenger-3.0.7/ext/apache2/mod_passenger.so

    #PassengerRoot /opt/ruby-enterprise-1.8.7-2010.02/lib/ruby/gems/1.8/gems/passenger-3.0.7

    #PassengerRuby /opt/ruby-enterprise-1.8.7-2010.02/bin/ruby

    … and other Passenger configuration directives (PassengerMinInstances for example)

  4. Now go find the file where you defined your virtual host, for me it was in
    /etc/apache2/sites-available/default
  5. Make it look like this (comment out all your other stuff for now, you can add other cool crap once you get it working)
    <VirtualHost *:80>
    ServerName www.yourapp.com
    DocumentRoot /path_to_your_app/public
    PassengerEnabled off
    ProxyPass / http://127.0.0.1:9292/
    ProxyPassReverse / http://127.0.0.1:9292/ #the trailing slashes here are VERY important
    </VirtualHost>
  6. now go to your app root and run
    puma -e production
  7. restart apache and navigate to your app and you should see it load right up

Couple of things to note

  • you will probably want to add a line to your production.rb that is simply
    config.threadsafe!
    It basically eager loads your app (vs autoloading the sections it needs) to help avoid problems with threading rails, you can learn more about config.threadsafe! in this very detailed post
  • I went from using close to 600MB of RAM to just 350MB and it was blazing fast!!!
    Then I moved over to using puma with nginx and Ruby 2.0.0 (post coming up) and it was even faster!
  • If you think you want to keep puma around then I encourage you to install the puma prerelease (currently 2.0.0.b4) by running
    gem install puma –prerelease
    once you do that, then you can run puma as a daemon by doing
    puma -d -e production
    otherwise you’ll have to have a terminal window open running it the way you run webrick/thin in dev
  • New relic reporting won’t work out the box unless you use the prerelease version
Thats it!
I hope you like puma as much as I do.

Ruby 2.0.0 is looking like its going to be substantially faster than Ruby 1.9.3

In very unscientific tests Ruby 2.0 is 60-70% faster than 1.9.3.
Very promising.

PS: I couldn’t get my test suite to run in Ruby 2.0.0 but I managed to run the very simple
“time bundle exec rake environment” test

The average was
– 7.74s for ruby 2.0.0
– 11.8s for ruby 1.9.3-p368, a 65% speed improvment, right in line with the results from the gist
– 17.07s for rubinius 2.0.0 (1.9 variant) … yeah thats slow

Minitest Spec giving you lots of “duplicate key” type errors? Read this

We just moved to the latest Test::Unit, which uses MiniTest under the hood. Because of that, I wanted to take advantage of the new MiniTest::Spec DSL to get RSpec-like syntax in Test Unit.

The problem is, when I went to the try using it, I started getting all sorts of strange duplicate key/column errors.


At first I thought it was because of a recent upgrade I had done from Postgres 9.1 to 9.2, but as I dug in deeper, I realized it was my new Spec Test. We are running our tests in transactions that we rollback on the completion of each test, MiniTest::Spec wasn’t doing this and causing all the test errors.

After hours of digging I finally found the solution to the minitest duplicate key issue here. I hope it saves you some time. Definitely did for me!

PS: The other alternative that was pointed out to me was to simply use the minitest-rails gem. I tried it but it didn’t work cleanly right out-the-box for our setup (errors in tests, etc). I was too tired to fix it up, so I’ll kick the can down the road till I need to revisit this issue, probably in upgrading to Rails 4.

What’s New in Rails 4 (with summary)

I learned from my mistake in falling behind when Rails 3 came behind, so I’m trying to get a jump on Rails 4. Skip straight to my summary if you don’t want to watch the 20 minute video right now

#400 What’s New in Rails 4 – RailsCastsShort Ruby on Rails screencasts containing tips, tricks and tutorials. Great for both novice and experienced web developers.

Embedly Powered


ActiveRecord
– Array and hstore support for Postgres
– Model.all is now an ActiveRecord Relation vs loading records immediately,  Model.all.to_a now gives you former Model.all behavior
– Model.scoped is deprecated
– Model.none (no idea why anybody would use this)
– Model.not.where() inverts/negates the scope/where clause
– chaining scopes to an active Relation object is possible with an ! at the end of the scope. This option mutates the current Relations object for you, so you don’t have to assign the new chain to a variable
– Model.find_by, Model.find_or_create_by now accepts a hash so that its Model.find_by(name: “Hello), stops dependence on method missing implementation of find_by_xxxx
– Model.find_or_create_by is deprecated but Model.find_by is not
– using an object as an Active Model object is easier, just include a module, used to be a bit more tedious
– in scopes you could pass in another scope as a second argument, now it has to be a callable object (like a lambda) this is to avoid passing in something Dynamic like Time.now by accident
– Model.update_attributes method has been renamed to just Model.update (probably to avoid confusion with update_attribute?)

Controllers
– the placeholder index.html file doesn’t exist anymore, dynamically generated
– turbolinks
– before_filter is renamed to before_action … won’t be deprecated though
– update action responds to PUT or PATCH, PUT might be deprecated
– support for strong parameters is built right in ( checkout Railscast Ep 371), better option that attar_accessible
– means that we don’t need attr_accessible in models but if you want that behavior still, you can use the protected attributes gem
– concerns. Designed to add modules which encapsulates behavior that you want to share among controllers/models. Ryan doesn’t care much for it, will add it in as needed in his apps (see Railscast ep 398)
– ActionController live (will be covered in future ep)

Views
– collections. collection_check_boxes, collections_radio_buttons. Can be used to handle associations or array attributes in forms more easily.
– helpers for html5 input types. date_field vs date_select (for example). Spits out html5 date control or just select input depending on the browser
– support for custom templating with .ruby extension. Probably limited usage for html, but useful for json (more in ep 379)
– cache Digest/Russian doll caching (more in ep 387)

Routes
– concerns, helps remove duplication in routes.
– match method is no longer supported (wtf?) have to change them from that to the right verb i.e get/patch/post
– if you supply constraints to a route its going to turn into a default attribute when you generate the url, so it forces the url to match the constraints. very cool
– new exception page, if its a routing error, you get all the routes in the app listed after it (kinda silly if you ask me)
– you can get all the routes in the app from /rails/info/routes

Other
– ability to specify console config options in application.rb with console block
– config.eager_load is default in production.rb so the entire app is loaded on start instead of autoloading, that helps keep Rails thread safe
– config.threadsafe! has been deprecated (more in ep 365)
– test directory is now structured differently, controllers, models, mailers vs functional, unit directories (big one here)
– Test::Unit now uses minitest under the hood which allows us to use rspec like syntax in Test::Unit

Removed
– Active Resource
– Model Observers
– Page & action Caching
– Disabling cache by default
– all available as gems if needed

Unit Testing and Mock Objects

Recently, I’ve been working hard to plug one of the biggest holes in my game … testing. I stumbled across this article, which helped make a lot of things clear for me, with respect to mocking and its relation to Unit testing.

This is partially due to the fact that most geeks don’t actually know what a unit test is. They think that testing the methods of a specific class constitutes a unit test, but that’s only part of the story. A unit test test is when you test the methods of a specific class in isolation, and the difference is critical. You know how some people call us “computer scientists”. Yeah, well this is the science part.

If you’re not doing this, you are not unit testing. That’s not meant to deride what you’re doing. I mean that as a literal statement of fact. Anyone, for example, who is using the built in Rails “unit” testing framework with fixtures (or FactoryGirl fixtures) is guilty of this. No test that relies on a separate class, or API, or interfaces with a database in any way is a unit test. It is an integration test (some people call them functional test), and when something goes wrong it is just a matter of time before it misleads you.

Enjoy the article – The Thing about Mock Objects